

How To Use Contact Adhesive For Rubber
Heading
Good preparation is key to a long-lasting adhesive bond on rubber. Gorilla Contact Adhesive works best where full surface contact is possible, and an instant hold is needed.
When rubber starts to peel or lift, it can quickly become more than a minor annoyance.
A car door seal that pulls away can let in water and road noise. A gym mat corner that curls upwards can turn into a trip hazard.
Rubber is strong. It is designed to flex and bend. However its flexibility makes it harder to bond securely.
Many standard adhesives struggle to grip smooth rubber surfaces, especially when they are under movement or pressure.
The guide below explains how to use Gorilla Contact Adhesive to achieve a reliable, permanent bond on rubber surfaces.
Why Rubber Can Be Difficult To Bond
Rubber moves, flexes and resists wear. These same properties can make it challenging for adhesives to grip securely.
Flexible polymers
Rubber is made from elastic polymers that stretch and return to shape. This means the surface is constantly moving.
Rigid adhesives cannot cope with that movement and may crack over time. Rubber needs an adhesive that can create a bond and tolerate slight flex without breaking down.
Low surface energy materials
Many types of rubber have what is known as low surface energy. This means that adhesives struggle to spread out across the surface.
Instead of spreading evenly and forming a strong bond, the adhesive sits on top. Without proper preparation and the right adhesive, this can reduce bond strength significantly.
Smooth or slightly oily finishes
Rubber components are manufactured with mould release agents, plasticisers or protective coatings.
These can leave an oily residue that is barely visible. Even when rubber looks clean, it may still have a surface layer that prevents proper adhesion. In addition, smooth rubber offers little texture for the adhesive to grip.
Good preparation is key to a long-lasting adhesive bond on rubber.
Rubber bonding is common in garages, workshops, homes and in construction across the UK.
Gorilla Contact Adhesive works best where full surface contact is possible, and an instant hold is needed.
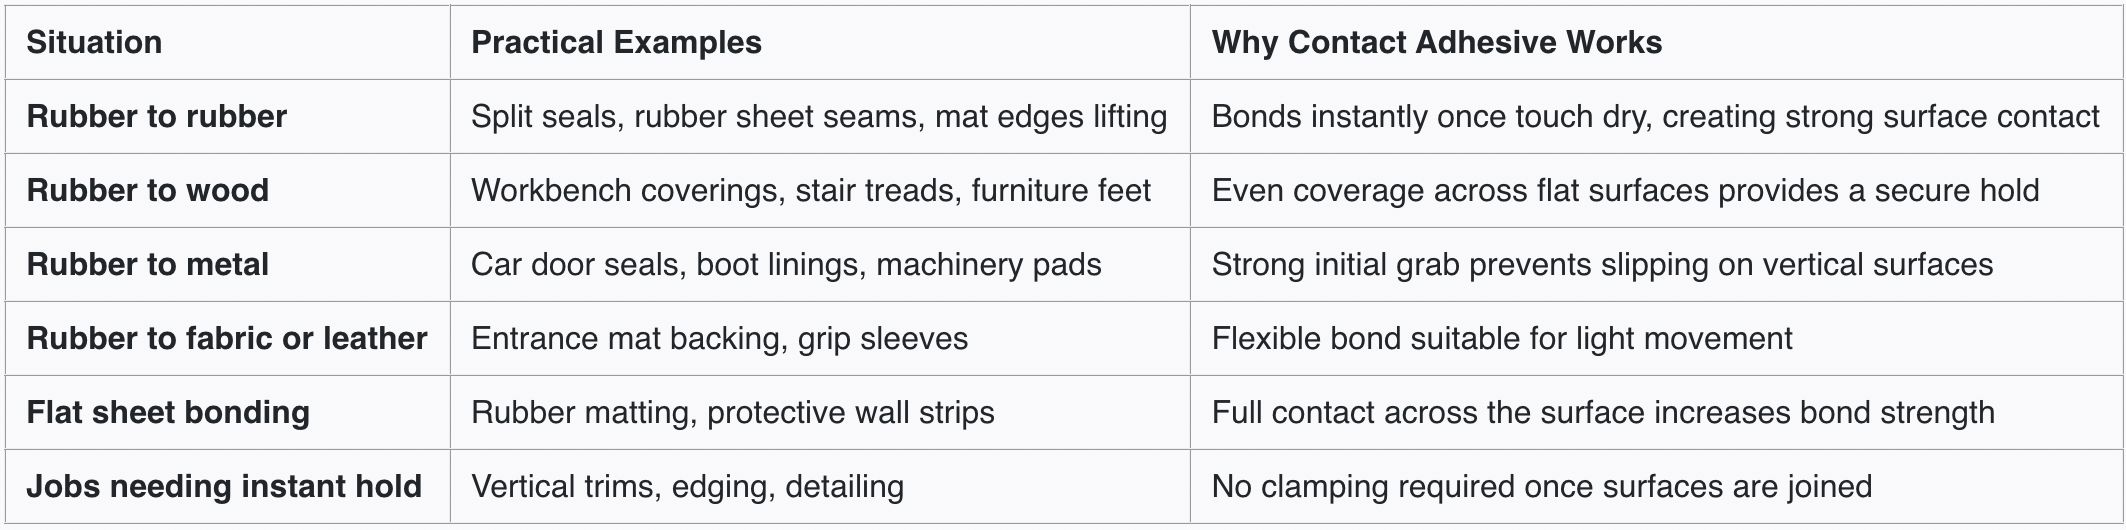
SituationPractical ExamplesWhy Contact Adhesive WorksRubber to rubberSplit seals, rubber sheet seams, mat edges liftingBonds instantly once touch dry, creating strong surface contactRubber to woodWorkbench coverings, stair treads, furniture feetEven coverage across flat surfaces provides a secure holdRubber to metalCar door seals, boot linings, machinery padsStrong initial grab prevents slipping on vertical surfacesRubber to fabric or leatherEntrance mat backing, grip sleevesFlexible bond suitable for light movementFlat sheet bondingRubber matting, protective wall stripsFull contact across the surface increases bond strengthJobs needing instant holdVertical trims, edging, detailingNo clamping required once surfaces are joined
What You Will Need
Before starting, gather everything required:
- Gorilla Contact Adhesive Tube
- A brush or mini roller
- Clean cloth
- Fine grit sandpaper
- Suitable solvent cleaner if needed
- Protective gloves
Step-by-Step Guide: Applying Gorilla Contact Adhesive Tube to Rubber
Step 1: Prepare the Area
Protect surrounding surfaces with paper, cardboard, or plastic sheeting to catch any spills.
Work in a well-ventilated area and keep a dry cloth nearby for quick clean-up of excess adhesive.
Step 2: Prepare Both Surfaces
All surfaces must be clean and completely dry before applying adhesive.
Clean the rubber thoroughly to remove dust, dirt, grease, and residue. For best results, lightly roughen smooth rubber using fine sandpaper to improve adhesion.
Wipe away any sanding dust and allow the surface to dry fully.
Important:
- Always prepare both surfaces
- If bonding rubber to rubber, lightly roughen both sides for a stronger bond
Step 3: Apply Adhesive to Both Surfaces
Apply a thin, even layer of Gorilla Contact Adhesive to each surface to be bonded.
Ensure full coverage, including the edges, to prevent lifting.
Expert Tip: A thin coat delivers the best performance: avoid over-applying, as excess adhesive can reduce bond strength and create a mess.
Step 4: Allow Adhesive to Partially Dry
Let the adhesive become tacky before joining:
- ~1 minute for repositionable bonding
- ~2 minutes for maximum bond strength
Do not join surfaces while the adhesive is still wet, as this can weaken the bond.
Step 5: Join the Surfaces Carefully
Once tacky, carefully align and bring the surfaces together.
Unlike traditional contact adhesives, this formula allows a 2–4 minute repositioning window (depending on the surface), giving you time to adjust placement before the bond becomes permanent.
Step 6: Press Firmly
Press the surfaces firmly together using even pressure across the entire area.
If possible:
- Use a roller or firm hand pressure to remove air pockets
- Apply weights or clamps to maintain contact
Allow at least 24 hours for full cure. Bond strength will continue to increase during this time.
Additional product notes
- Not suitable for polypropylene (PP), polyethylene (PE), polystyrene (PS), or rubber with high oil & plasticizer content.
- Fully cured adhesive is flexible, waterproof, and durable.
- Apply between 10°C and 32°C for best results.
- Cure time may increase in low temperatures or on non-porous surfaces.
Using Contact Adhesive For EPDM Rubber Roofing
One of the most recognisable rubber applications in UK construction is EPDM rubber roofing membrane. Found on garages, sheds and flat roof extensions, it is designed to withstand changeable weather conditions.
Over time, perimeter edges can lift, trims can loosen, or detailing may need securing to timber.
These are the types of repairs where Gorilla Contact Adhesive can be useful.
It provides strong surface bonding and instant grab once both sides are touch-dry. In addition, it works on vertical surfaces, which is ideal for adhering EPDM to uprights.
As with all rubber bonding, preparation of the substrates is essential. The substrate and membrane must be clean, completely dry and free from debris before the adhesive is applied.
When applying contact adhesive, ensure the membrane is coated evenly to achieve a flat, secure bond.
Note: Contact adhesive is suitable for small repairs and detailing work. It is not intended for full roof membrane installations or covering large roof areas, which require specialist roofing adhesives.
Complete Guide To Stronger Rubber Repairs
Rubber can be challenging to bond without the right method. By following the guidance above and the manufacturer’s instructions, Gorilla Contact Adhesive delivers a durable bond.
Visit the Gorilla Glue Blog for practical project tips.
Information provided within this content is for informational and consideration purposes only.
For the toughest jobs on planet Earth®